Natural-looking Hair Transplant: How Can It Be Done?
We see our hairline in the mirror daily, which is a paramount component of our look and self-identity.
As such, it is not surprising that losing its shape and density urges many men to take action.
Chris reached out to our clinic on the 26th of June 2018.
He explained to our colleagues that he had been experiencing hair loss along his hairline and was looking for the most natural hair transplant solution.
In this post, we will take an in-depth look at Chris’ hair transplant and the evolution of his hairline throughout the post-op months.
Chris’ hair loss
Chris met us on the 3rd of July 2018.
After inspecting and ensuring that the donor area allows extraction, the doctor continued with Chris’s priority, his hairline.
His temples have pushed back a bit, so the doctor discussed and sketched the hairline he had in mind:

To achieve Chris’ goal and fill the frontal area as shown, the doctor explained that around 2000 hairs would be needed.
The examination also revealed the early signs of hair loss at the crown area too.
But while filling up the temples was feasible, the doctor advised Chris against implanting hairs to the back.
The hair loss process typically starts with the miniaturization of the hairs.
At this very early stage, the hair strands start to weaken and lose their original thickness but remain in place.
As more and more hairs become thinner and thinner, the scalp starts to peek through in the area.
For the hair transplant to be effective, a bit of distance is needed in between the hairs.
If there is not enough space, we might harm the root underneath the skin during the implantation.
One new hair put in, one native hair lost – this would prevent us from achieving a significant change in the density.
Chris’ FUE2 hair transplant
Chris booked his hair transplant surgery with HairPalace for the 19th of October 2018.
Transplanting the 2000 hairs is a one-day procedure which takes around 4-6 hours to complete.
The first part of the procedure is the extraction.
After numbing the donor area at the back and sides, the doctor extracts the hairs one by one.
The assistants count the hairs as they clean and prepare them for implantation under the microscope.
This way we can ensure that we extract only as many hairs as we need.
Then, after the lunch break, we start the second phase of the transplant.
First, we finalize the recipient area – in Chris’ case, we have refined the shape and position of the hairline.
Then we administered the local anaesthetic and moved on to implanting the hairs.
Here is how Chris’ recipient area looked just after we finished his hair transplant:

As we can see on the photo, besides building out the hairline, the surgeon reached deeper into the frontal region, especially on the right.
We carry out the entire procedure under a magnifying glass, so we see each hair precisely.
This allows us to fill the gaps wherever necessary and ensure that the final result will be even and natural-looking.
The post-op period
The day after the natural hair transplant surgery is done, patients can travel home.
In the first period, the hairs will need special care, so naturally, patients leave the clinic equipped with the detailed post-op instructions.
We also monitor the healing and the regrowth of the hairs through regular check-ups.
Let’s take a look at how Chris’ result evolved in the months after his hair transplant.
1-week check-up:
In the first post-op week, nothing can touch the implanted area.
This means that patients cannot cover nor wash their head. Instead, a sterile saline solution must be sprayed on the implanted area to keep it clean.
Patients can start soaking their scalp and then gently massaging it from the 2nd post-op week after the tiny pinpricks healed up.
Besides the scabs, some redness is usually visible in the implanted area. Especially after larger surgeries, patients might experience some swelling too caused by the lidocaine used to numb the scalp.
In Chris’ case, everything was in order 7 days after his surgery. We can also see how much his hair has grown in just a week!

3-weeks check-up:
From the 3rd post-op week, patients have to continue the daily wash with baby shampoo.
Patients have to stick to the no hats and no exercise rules for the week, but afterwards, they can gradually return to their normal routine.
Chris’ scalp was free of scabs and was healing properly. We can see some redness on his photo, but it is still alright.
Patients with fair, sensitive skin might expect it to take a couple of weeks until the pinkish colour completely fades away.

3 and 6-month check-ups:
Between the 3rd week and the 3rd month, the transplanted hairs fall out.
The process differs patient by patient – in Chris’ case, many of the hairs have already started to grow out:

The complete growth period takes months, so patients experience a gradual change.
The speed and duration of the process are heavily affected by individual qualities.
But typically around the 6-9th month, the progress is already perceptible.
The change was also visible at the temple area by Chris’ 6 months check-up:

Hair transplant natural hairline results
For his final check-up, Chris contacted us again.
The doctor inspected both the donor and the implanted areas. She found that the hairs have grown out well, providing a good density and a natural-looking hairline.
But more importantly, we were interested in how Chris felt about the result.
He shared that he was satisfied with his natural hairline hair transplant and was happy with his decision to go ahead with it.
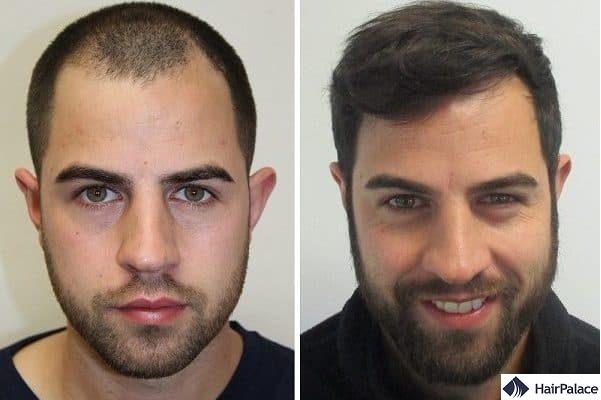
Below you can take a close look at Chris’ hairline before and a year after his hair transplant:

FAQ
To make a hair transplant look natural, it’s essential to choose an experienced surgeon who uses advanced techniques like follicular unit extraction (FUE) or follicular unit transplantation (FUT). The key is to ensure the hairline is designed to match your facial features and age, and that the implanted hairs are placed in the correct direction and density, mimicking natural hair growth patterns.
A hair transplant can look very natural, especially when performed by an experienced surgeon using advanced techniques like Follicular Unit Extraction (FUE) or Direct Hair Implantation (DHI). The key to a natural result lies in the careful placement, angle, and density of the transplanted hairs to match your natural hair growth pattern.
A hair transplant uses your real hair. The hair follicles are typically taken from the back or sides of your scalp, areas that are resistant to balding—and then transplanted to the thinning or balding areas. Because it’s your natural hair, it grows just like the rest of your hair and can be washed, cut, and styled as usual.